
 Posted in
How to Add Facebook Like Button Below Post Titles
 10:39 PM
 Roy
Roy
If you wish to add this new like button code just below the post titles of your blogger blogs then follow these easy steps:
Adding Facebook Like Button To Blogger
1. Go To Blogger > Design > Edit HTML
2. Backup your template
3. Click the "Expand Widgets Templates" Box
4. Search for this,
Visit your blog to see it working just fine just below post titles. Feel free to ask any questions you may have.
Adding Facebook Like Button To Blogger
1. Go To Blogger > Design > Edit HTML
2. Backup your template
3. Click the "Expand Widgets Templates" Box
4. Search for this,
<data:post.body/>5. Just above it paste the code below,
<iframe allowTransparency='true' expr:src='"http://www.facebook.com/plugins/like.php?href=" + data:post.url + "&layout=button_count&show_faces=false&width=100& action=like&font=arial&colorscheme=light"' frameborder='0' scrolling='no' style='border:none; overflow:hidden; width:100px; height:20px;'/>6. Save your template and you are done!
Visit your blog to see it working just fine just below post titles. Feel free to ask any questions you may have.
How to Check PAGE RANK of Web site pages Instantly
4:14 AM
Roy
In order to check pagerank of a single web site, web page or domain name, please submit the URL of that web site, web page or domain name to the form below and click "Check PR" button.
the free PR checker tool enables you to check the current pagerank of your web site instantly via the form above, however, you might consider to be quite boring to visit online page rank checking tool every time you'd like to check Google pagerank of your web pages..
so, it might be a good idea to put a small page rank icon to your site to check and display your Google rankings right on your web site pages. To check PR icons - click here.
Check Page Rank of your Web site pages instantly: |
This page rank checking tool is powered by Page Rank Checker service |
the free PR checker tool enables you to check the current pagerank of your web site instantly via the form above, however, you might consider to be quite boring to visit online page rank checking tool every time you'd like to check Google pagerank of your web pages..
so, it might be a good idea to put a small page rank icon to your site to check and display your Google rankings right on your web site pages. To check PR icons - click here.
How can I make my blog load faster?
2:57 PM
Roy
The speed at which your blog loads is critical to attracting more readers to your blog. If your blog takes a long time to load, many readers may leave your blog before they have the chance to read it. Here are a few tips and tricks that will help your blog load faster and attract more users:

The more images, videos and other multi-media you have on your blog the longer it will take to load. However, images and other multimedia are important to attracting users to your blog, so it is important to optimize the load speed of your images and media. Here are a few tips to increase the load speed of your media:
Posts
Your blog's load time can be affected by the number of posts you display on your main page. You can easily edit the number of posts displayed of the main page from the Settings | Formatting tab. You can then select the number of posts you want to display on the main page. We recommend displaying 10 or fewer posts on the main page.Third Party JavaScript and Links
For optimal blog load speed, we recommend using Google/Blogger widgets, JavaScript and links. However, if you need to use third party JavaScript and links, your blog will load much faster if you put all JavaScript at the bottom of your blog. If you have third party JavaScript and links in your sidebar, put them in at the bottom of the sidebar.The more images, videos and other multi-media you have on your blog the longer it will take to load. However, images and other multimedia are important to attracting users to your blog, so it is important to optimize the load speed of your images and media. Here are a few tips to increase the load speed of your media:
- Decrease the size of your images or use thumbnails that link to the full-size image.
- If you use third party images, consider uploading them to Picasa Web Albums via the Blogger post editor.
- If you have a large number of images to display, you can upload all your images (from a vacation or event) to a Picasa Web Album and link to the album in your post or sidebar.
Other suggestions
- If you've added any custom CSS to your blog, make sure you put it at the top of the page.
- The most important content of your blog that catches readers attention should load the quickest. To help you identify which items are taking the longest to load you can use Stopwatch. To use Stopwatch, enter your blog's URL into the text box and click "Start StopWatch". Stopwatch will then open your blog in a frame and will record the time it takes for everything on your blog to load, including images, videos, widgets, etc. Take note of the items that take the longest to load and modify them appropriately using our suggestions.
How to make 5-Stars Premium Template for Blogger
10:45 AM
Roy
 Are You looking for free professional and premium blogger template ?
Then absolutely you came to the right place !
DEMO | DOWNLOAD
PREMIUM AND HIGH QUALITY BLOGGER TEMPLATE !
NOT EASY TO GET EVERYWHERE … THAT IS WHY I HAVE CREATED THE 5 STARS PREMIUM THEME
5 STARS PREMIUM THEME CONTAINED THE FOLLOWING FUNCTIONS :
- PROFESSIONAL LOOKING BLOGGER TEMPLATE
- FULLY WIDGETS
- ADSENSE ADS OPTIMIZED TOP
- ADSENSE ADS OPTIMIZED BELOW POST
- HIGH QUALITY GRAPGHIC PICKED
- AUTO READ MORE FUNCTION
- RELATED POST WIDGET
- THREE COLUMNS UPPER SECTION
- THREE COLUMNS BOTTOM SECTION
- RSS FEEDS COSTUMIZED WIDGET
- SEARCH BAR
INSTALLATION :
FOR THE LOGO JUST SEARCH FOR THE FOLLOWING CODE :
.logo {AND REPLACE THE IMG LINK WITH YOURS! AND IF YOU WANT TO REMOVE THE IMAGE AND USE ONLY TEXT! THAN JUST DELETE THE FOLLOWING CODE:
background : transparent url(http://lh3.ggpht.com/_9b1traaMESE/Spfnvvf9feI/AAAAAAAAAzo/CvLAvzrjGso/PROFESSIONAL%20LOGO.png) no-repeat scroll 0 0;
display : block;
float : left;
width : 400px;
padding : 10px 0 0 25px;
height : 80px;
overflow : hidden;
text-indent : -9999em;
}
background : transparent url(http://lh3.ggpht.com/_9b1traaMESE/Spfnvvf9feI/AAAAAAAAAzo/CvLAvzrjGso/PROFESSIONAL%20LOGO.png) no-repeat scroll 0 0;
text-indent : -9999em;
FOR FEEDBURNER EMAIL FEEDS JUST REPLACE (BloggerDashboard) WITH (YOURFEEDBURNER)
FOR THE ADSENSE 468X60 AT THE TOP ! YOU NEED TO SEARCH FOR THE FOLLOWING CODE AND REPLACE IT WITH ADSENSE !
http://lh4.ggpht.com/_9b1traaMESE/SpfdyI2EiOI/AAAAAAAAAzk/OEgjMBD4OcQ/ADS BANNER.pngPLEASE COMMENT BELLOW IF YOU LIKE THE TEMPLATE ! YOUR OPINION IS THE POST IMPORTANT FOR ME ! SO PLEASE IF YOU FIND SOMETHING NEED TO BE CHANGE OR YOU HAVE MORE SUGGESTIONS ABOUT THIS NICE THEME ! JUST WRITE YOUR COMMENT BELLOW PLEASE :)
How to make Newspaper Style Blogger Template
10:23 AM
Roy

Newspaper Style Blogger Template
Many of my friends of my visitors was asking me to design a template like newspaper style! I have tried and tried until came out this design which i hope from you guys that you will like it .This template it has the following functions :
- High quality graphics designs
- High quality png icons
- Beautiful Magazine Style
- Beautiful Rss Button
- Attractive Social Bookmarking Widget with fancy icons
- Read more function
- Twitter widget
- Page Navigation like wordpress themes
- Nice rounded search bar
Enjoy this release and comment below if you have something want to say!
How to hide labels from blogger post footer
9:36 AM
Roy

Hide labels from blogger post footer ! just very easy as you want :)
Many people want or prefer to hide labels or tags from the post footer ,therefore we are going to the following steps !
How to add New Read More widget for Blogger (the latest)
8:53 AM
Roy
Finally blogger give easy way to make read more like wordpress.com, this function only active if you use new post editor. With Jump Breaks you can show just a snippet of your post on your blog's index page. Blogger will insert a "Read more" link to the full post page where your readers can keep reading.
Setting –> Basic –> Choose “updated editor”
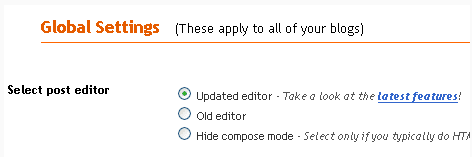
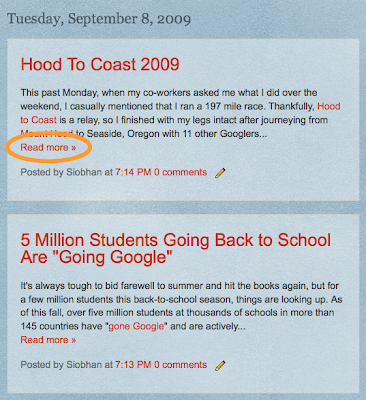
There are a couple of ways to insert a "Read more" jump to your posts. If you use the new post editor (available on Blogger in Draft, or by enabling it via the Settings tab), you'll notice the "Insert jump break" icon in the editor's toolbar. Click this icon and the "jump break" will be inserted into your blogpost at your cursor's position.

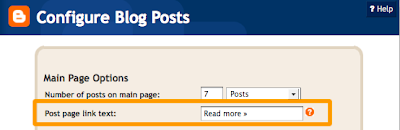
Want to change the "Read more" text to something more your style? No problem. You can edit the"Read more" text by clicking Layout and then Edit the Blog Posts widget.
One more note, the Jump Break feature does not change how your post appears in your feed. You can configure post feed options by going to Settings | Basic | Site Feed, and editing Allow BlogFeeds.
How do I show ads between my posts?
9:34 AM
Roy
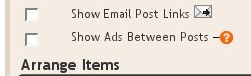
If you want to show ads between your posts but chose not to do it while initially signing up for AdSense, first go to your Template | Page Elements tab. Then, in the "Blog Posts" section, click on "Edit". A pop-up window will appear with options to configure your blog posts. Check the box next to "Show Ads Between Posts". (Note: You must be signed up for AdSense before you can check this box.)
 Once you check this box you'll see the configuration options for your ads. You can then select how often you would like ads to be shown after your posts.
 For example, if you want ads to be displayed after every post, select "1" from the drop-down menu. (Please note that AdSense policies limits you to a total of 3 ad units per page and Blogger will automatically prevent you from going over this limit.) You can then select your ad format and colors. Once you have finished configuring your ads, click on the orange "Save Changes" button in the bottom right corner.
Once you check this box you'll see the configuration options for your ads. You can then select how often you would like ads to be shown after your posts. For example, if you want ads to be displayed after every post, select "1" from the drop-down menu. (Please note that AdSense policies limits you to a total of 3 ad units per page and Blogger will automatically prevent you from going over this limit.) You can then select your ad format and colors. Once you have finished configuring your ads, click on the orange "Save Changes" button in the bottom right corner.How to put AdSense and Google Affiliate Network in your blog's sidebar
9:30 AM
Roy
Note: This article assumes you are using a classic template. For Layouts-enabled blogs, you can simply add a new AdSense page element to your sidebar, or drag an existing element to the desired location.
If you're new to AdSense and not too familiar with making modifications to your blog's template, you can follow these instructions for placing AdSense code in your blog's sidebar (using the Minima template as an example).
Assuming you have already signed up and been approved for a Google AdSense account, you should be able to log in here. Once you're signed in, click the AdSense Settings tab near the top of the page. To cut right to the chase, focus on these steps:
Once you sign up and are approved for a Google Affiliate Network account, you can sign in here to view your account. Once you're signed in, click the Links tab near the top of the page. Select which advertiser's links you want to work with, and then follow these steps:
If you're new to AdSense and not too familiar with making modifications to your blog's template, you can follow these instructions for placing AdSense code in your blog's sidebar (using the Minima template as an example).
Assuming you have already signed up and been approved for a Google AdSense account, you should be able to log in here. Once you're signed in, click the AdSense Settings tab near the top of the page. To cut right to the chase, focus on these steps:
- Choose Your Ad Layout - To fit ads in your sidebar, it's best to choose one of the following ad layouts.
Button (125x125)
Skyscraper (120x600)
Wide Skyscraper (160 x 600)
Vertical Banner (120 x 240)
Small Rectangle (180x150)
- Choose a color palette - They are very cleverly named but it's really just a matter of your preference.
- Copy your AdSense code - At the bottom of the page, there's a box with code in it. Highlight all of that code and copy it.
- Paste the code somewhere - Notepad or Text Edit or something like that is a good place for now.
- Go to Blogger.com and sign in - Choose the blog you want to put ads on and click the template tab.
- This is less of a step and more of a precaution - Copy your entire Blogger template and save it in Notepad or Text Edit just in case.
- Find the place in your template that says this; you might have to scroll down pretty far:
<!-- Begin #sidebar -->
<div id="sidebar"><div id="sidebar2">
- Paste the AdSense code you saved earlier right after that part.
<!-- Begin #sidebar -->
<div id="sidebar"><div id="sidebar2">
PUT YOUR ADSENSE CODE HERE!
- Save your template changes and republish your blog.
How to put Google Affiliate Network links in your blog's sidebar
If you're new to Google Affiliate Network and not too familiar with making modifications to your blog's template, you can follow these instructions for placing Google Affiliate Network links in your blog's sidebar (using the Minima template as an example).Once you sign up and are approved for a Google Affiliate Network account, you can sign in here to view your account. Once you're signed in, click the Links tab near the top of the page. Select which advertiser's links you want to work with, and then follow these steps:
- Choose your links - In the 'Links' section of your profile, select the advertiser whose links you want to use. Click Get Links in the Action drop down menu next to the advertiser's name. Click either the Text Links or the Image Links tab to view your options in each category. To fit ads in your sidebar, it's best to choose one of the following dimensions for an image link:
Button (125x125)
Skyscraper (120x600)
Wide Skyscraper (160 x 600)
Vertical Banner (120 x 240)
Small Rectangle (180x150)
- Copy your Affiliate link HTML - Just beneath your desired link, click Get HTML. A box with code in it will appear. Highlight all of that code, then copy and paste it into Notepad, Text Edit, or a similar program.
- Sign in to Blogger - Choose the blog you want to put ads on and click the Template tab.
- Caution - Copy your entire Blogger template and save it in Notepad or Text Edit just in case.
- Find the place in your template that says:
<!-- Begin #sidebar -->
<div id="sidebar"><div id="sidebar2">
- Paste the Affiliate link HTML you saved earlier right beneath that place in the template:
<!-- Begin #sidebar -->
<div id="sidebar"><div id="sidebar2">
PUT YOUR AFFILIATE LINK HTML HERE!
- Save your template changes and republish your blog.
What are backlinks and how do I use them?
9:26 AM
Roy
The Quick Answer
- Backlinks display other webpages that link to your posts.
- To enable backlinks on your blog go to your Settings|Comments tab and select Show
The backlinks setting can be found under the Settings | Comments tab, and consists of a single, simple option to turn it on or off:
 Our default templates are already set up with the necessary code for backlinks. However, if you have a custom template, or one of our templates from before this feature was launched, you will need to add the code yourself. Instructions for that are here.
Once everything is set up, you'll see a new link marked "Links to this post" next to the comment link for each post:
 If you click that link you'll be taken to the post page, where the backlinks are all listed beneath the comments. Clicking the triangles next to each link will display a snippet of text from the page linking to you, as well as some author and date information.
 If you want to turn off backlinks for individual posts, you can do so. The process is the same as that for turning off comments. Just edit the post in question and change the options that appear below the posting form:
 Notes:
 - For the curious, this feature is based on the
link:operator of Blog Search. So sites linking to your blog will need to be indexed by Blog Search and there may be a slight delay before the backlinks appear on your blog. - The comment notification email setting does not apply to backlinks, so you will not be notified of new links when they appear. This is because these links are looked up on-the-fly each time you view an individual post.
- In lieu of comment notification, you can use Blog Search with a query such as
link:your-blog-here.blogspot.com, and then subscribe to the results. That will have a similar effect.
How to add Paypal Donation
10:23 AM
Roy
This post explains how to add a Paypal donate button to your blog.
Adding a Paypal donation button to your blog will give your loyal readers a chance to support(encourage) you by donating a few bucks.
If you don't have a paypal account yet,.. you can get a Free Paypal account here.
so,let's see how to put a Paypal donation button in your blog...
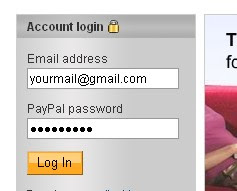
1.First,Log in to your Paypal account.
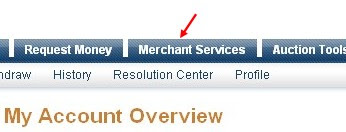
2.Click on the 'Merchant Services' tab (see at the top of the page).
3.Scroll down the window and you will see an option "Donations" in the right sidebar.Click on it!

4.Now,you will see some options like Donation name/service ,donation id,etc etc...
The first field (Donation name/service) is the only thing that is required and all the remaining fields are optional.
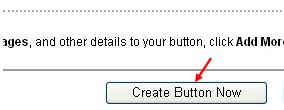
Enter that first field,choose a button style,scroll down the window and click on "Create a button Now"
5.Now,you will see some html code... Copy it and sign in to your blogger dashboard »» Click on the layout »» Add a Page element »» html/javascript »» and paste that html code and SAVE THE CHANGES.
Here is how the button will look in your sidebar
Adding a Paypal donation button to your blog will give your loyal readers a chance to support(encourage) you by donating a few bucks.
If you don't have a paypal account yet,.. you can get a Free Paypal account here.
so,let's see how to put a Paypal donation button in your blog...
1.First,Log in to your Paypal account.

2.Click on the 'Merchant Services' tab (see at the top of the page).

3.Scroll down the window and you will see an option "Donations" in the right sidebar.Click on it!

4.Now,you will see some options like Donation name/service ,donation id,etc etc...
The first field (Donation name/service) is the only thing that is required and all the remaining fields are optional.
Enter that first field,choose a button style,scroll down the window and click on "Create a button Now"

5.Now,you will see some html code... Copy it and sign in to your blogger dashboard »» Click on the layout »» Add a Page element »» html/javascript »» and paste that html code and SAVE THE CHANGES.
Here is how the button will look in your sidebar
How to add Paypal Donation widget in your blog
10:16 AM
Roy

But there are some requirements of this widget . You must need a paypal account. Do you have it ? Yes.Thats good .If not signup to paypal and its free.But the paypal account must be verified either by entering your card number or Bank Account.
Now the time comes to setup paypal donation widget in your blog . Just copy the Following Code and paste it to your blog by adding a new page Element.
Code:
<-- The-Online-Quest Pay Pal Donation Form Code Start -->

<center><table width="143" cellspacing="0" cellpadding="0" style="border: 1px solid #000000; padding: 5px;"><tr><td><p align="center"><b>Please Donate To My Blog</b></p></td></tr><tr><td width="145"><form action="https://www.paypal.com/row/cgi-bin/webscr" name="_xclick" method="post"><input value="Thanks for Your Donations - Blog/Website Title" name="item_name" type="hidden"/><input value="Your paypal email" name="business" type="hidden"/><p style="margin-top: 0; margin-bottom: 0"><input value="_xclick" name="cmd" type="hidden"/><!-- input type="hidden" name="amount" value="1.00" --><b>Amount</b> <p style="margin-top: 0; margin-bottom: 0"> <select name="Amount" size="1"><option selected value="1.00"/>1.00<option value="2.00"/>2.00<option value="3.00"/>3.00<option value="4.00"/>4.00<option value="5.00"/>5.00<option value="10.00"/>10.00<option value="15.00"/>15.00<option value="20.00"/>20.00<option value="25.00"/>25.00<option value="30.00"/>30.00<option value="35.00"/>35.00<option value="40.00"/>40.00<option value="45.00"/>45.00<option value="50.00"/>50.00<option value="100.00"/>100.00<option value="200.00"/>200.00<option value="300.00"/>300.00<option value="400.00"/>400.00<option value="500.00"/>500.00<option value="1000.00"/>1000.00</select><p style="margin-top: 0; margin-bottom: 0"><b>Currency</b> <select name="currency_code" size="1"><option value="AUD"/>Australian Dollar<option selected value="USD"/>USD<option value="GBP"/>British Pound<option value="CAD"/>Canadian Dollars<option value="CZK"/>Czech Koruna<option value="DKK"/>Danish Kroner<option value="EUR"/>EUR<option value="HKD"/>Hong Kong Dollars<option value="HUF"/>Hungarian Forint<option value="JPY"/>Japanese YEN<option value="NZD"/>New Zealand Dollars<option value="NOK"/>Norwegian Kroner<option value="PLN"/>Polisg Zlotych<option value="SGD"/>Singapore Dollars<option value="SEK"/>Swedish Kronor<option value="CHF"/>Swiss Francs</select></p><p style="margin-top: 0; margin-bottom: 0" align="center"><input border="0" alt="Make payments with PayPal - it's fast, free and secure!" width="60" src="http://www.blogpulp.com/imagehost/images/5971708800.gif" name="submit" height="30" type="image"/></p></p></p&g
t;
</form></td></tr><tr><td><p align="right"><b><font face="Arial" size="1"><a href="http://bloggerehow.blogspot.com/2011/06/how-to-add-paypal-donation-widget-in.html" target="_blank"> The-Online-Quest</a> <a href="http://bloggerehow.blogspot.com/2011/06/how-to-add-paypal-donation-widget-in.html">Blogger eHow</a></font></b></p></td></tr></table></center>

<!-- End of The-Online-Quest Pay Pal Donation Form Code --><center><a href="http://bloggerehow.blogspot.com/2011/06/how-to-add-paypal-donation-widget-in.html">Add this Box to my Blog</a></center>
In this widget we have modified a little and you should also modify it a little. In the above code you have to edit some code for your use.
Change Your Paypal Email with your own Paypal account email . For Example my paypal Email is deineshd@gmail.com so i have to change it to deineshd@gmail.com.
Another is Change Blog/website Title with your own Blog/Website Title. For example my Blog title is Bloganol therefore i should change it to Bloganol.
I hope you understand my words . If not then leave a comment.
Remember Asking donation is not bad . Our John Brother also asks donation via his blog and also shows income earned by taking donation in his monthly income.

