How to add Paypal Donation

This post explains how to add a Paypal donate button to your blog.

Adding a Paypal donation button to your blog will give your loyal readers a chance to support(encourage) you by donating a few bucks.
If you don't have a paypal account yet,.. you can get a Free Paypal account here.

so,let's see how to put a Paypal donation button in your blog...

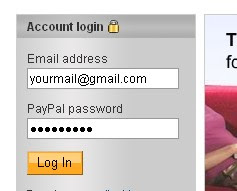
1.First,Log in to your Paypal account.
First,Log in to your Paypal accoun
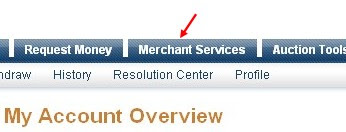
2.Click on the 'Merchant Services' tab (see at the top of the page).

Click on the 'Merchant Services' tab (see at the top of the page)
3.Scroll down the window and you will see an option "Donations" in the right sidebar.Click on it!
Scroll down the window and you will see an option

4.Now,you will see some options like Donation name/service ,donation id,etc etc...
The first field (Donation name/service) is the only thing that is required and all the remaining fields are optional.
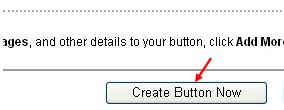
Enter that first field,choose a button style,scroll down the window and click on "Create a button Now"
click on

5.Now,you will see some html code... Copy it and sign in to your blogger dashboard »» Click on the layout »» Add a Page element »» html/javascript »» and paste that html code and SAVE THE CHANGES.

Here is how the button will look in your sidebar


How to add Paypal Donation widget in your blog

Have you ever seen Paypal donation box on other blogs . If yes then you must be wondering to put this donation on your blog but unable to create this box to put on your blog. If no then see here. This Paypal donation box was created by the online Quest . But the widget was not complete . There needs some modification on this widget . Therefore bloganol modifies this widget and brings you this widget.
But there are some requirements of this widget . You must need a paypal account. Do you have it ? Yes.Thats good .If not signup to paypal and its free.But the paypal account must be verified either by entering your card number or Bank Account.
Now the time comes to setup paypal donation widget in your blog . Just copy the Following Code and paste it to your blog by adding a new page Element.
Code:

<-- The-Online-Quest Pay Pal Donation Form Code Start -->

<center><table width="143" cellspacing="0" cellpadding="0" style="border: 1px solid #000000; padding: 5px;"><tr><td><p align="center"><b>Please Donate To My Blog</b></p></td></tr><tr><td width="145"><form action="https://www.paypal.com/row/cgi-bin/webscr" name="_xclick" method="post"><input value="Thanks for Your Donations - Blog/Website Title" name="item_name" type="hidden"/><input value="Your paypal email" name="business" type="hidden"/><p style="margin-top: 0; margin-bottom: 0"><input value="_xclick" name="cmd" type="hidden"/><!-- input type="hidden" name="amount" value="1.00" --><b>Amount</b> <p style="margin-top: 0; margin-bottom: 0"> <select name="Amount" size="1"><option selected value="1.00"/>1.00<option value="2.00"/>2.00<option value="3.00"/>3.00<option value="4.00"/>4.00<option value="5.00"/>5.00<option value="10.00"/>10.00<option value="15.00"/>15.00<option value="20.00"/>20.00<option value="25.00"/>25.00<option value="30.00"/>30.00<option value="35.00"/>35.00<option value="40.00"/>40.00<option value="45.00"/>45.00<option value="50.00"/>50.00<option value="100.00"/>100.00<option value="200.00"/>200.00<option value="300.00"/>300.00<option value="400.00"/>400.00<option value="500.00"/>500.00<option value="1000.00"/>1000.00</select><p style="margin-top: 0; margin-bottom: 0"><b>Currency</b> <select name="currency_code" size="1"><option value="AUD"/>Australian Dollar<option selected value="USD"/>USD<option value="GBP"/>British Pound<option value="CAD"/>Canadian Dollars<option value="CZK"/>Czech Koruna<option value="DKK"/>Danish Kroner<option value="EUR"/>EUR<option value="HKD"/>Hong Kong Dollars<option value="HUF"/>Hungarian Forint<option value="JPY"/>Japanese YEN<option value="NZD"/>New Zealand Dollars<option value="NOK"/>Norwegian Kroner<option value="PLN"/>Polisg Zlotych<option value="SGD"/>Singapore Dollars<option value="SEK"/>Swedish Kronor<option value="CHF"/>Swiss Francs</select></p><p style="margin-top: 0; margin-bottom: 0" align="center"><input border="0" alt="Make payments with PayPal - it's fast, free and secure!" width="60" src="http://www.blogpulp.com/imagehost/images/5971708800.gif" name="submit" height="30" type="image"/></p></p></p&g
t;
</form></td></tr><tr><td><p align="right"><b><font face="Arial" size="1"><a href="http://bloggerehow.blogspot.com/2011/06/how-to-add-paypal-donation-widget-in.html" target="_blank"> The-Online-Quest</a> <a href="http://bloggerehow.blogspot.com/2011/06/how-to-add-paypal-donation-widget-in.html">Blogger eHow</a></font></b></p></td></tr></table></center>

<!-- End of The-Online-Quest Pay Pal Donation Form Code --><center><a href="http://bloggerehow.blogspot.com/2011/06/how-to-add-paypal-donation-widget-in.html">Add this Box to my Blog</a></center>
In this widget we have modified a little and you should also modify it a little. In the above code you have to edit some code for your use.
Change Your Paypal Email with your own Paypal account email . For Example my paypal Email is deineshd@gmail.com so i have to change it to deineshd@gmail.com.
Another is Change Blog/website Title with your own Blog/Website Title. For example my Blog title is Bloganol therefore i should change it to Bloganol.
I hope you understand my words . If not then leave a comment.
Remember Asking donation is not bad . Our John Brother also asks donation via his blog and also shows income earned by taking donation in his monthly income.


How to add animated recent post with thumbnails

If you want to display the Recent Posts with thumbnails of your Blogger blog in animated style instead of the plain text as shown in the image given then now you can do that using the Animated Recent Post Widget With Thumbnails For Blogger/Blogspot.

To add the Animated Recent Post Widget With Thumbnails in your Blogger/Blogspot blog, just follow the easy steps given below.

1. Log in to your Blogger account

2. Now click on the Design on your Dashboard and then click on the Page Element.

3. Click on the Add A Gadget and select 'HTML/Javascript' widget

4.Copy and paste the given code below in the 'HTML/Javascript' box.

<script src="http://ajax.googleapis.com/ajax/libs/jquery/1.3.2/jquery.min.js" type="text/javascript"></script>
<style type="text/css" media="screen">
<!--
#spylist {
overflow:hidden;
margin-top:5px;
padding:0px 0px;
height:350px;
}
#spylist ul{
width:220px;
overflow:hidden;
list-style-type: none;
padding: 0px 0px;
margin:0px 0px;
}
#spylist li {
width:208px;
padding: 5px 5px;
margin:0px 0px 5px 0px;
list-style-type:none;
float:none;
height:70px;
overflow: hidden;
background:#fff url(http://dl.getdropbox.com/u/708209/scriptabufarhan/recentspy/post.jpg) repeat-x;
border:1px solid #ddd;
} #spylist li a {
text-decoration:none;
color:#4B545B;
font-size:11px;
height:18px;
overflow:hidden;
margin:0px 0px;
padding:0px 0px 2px 0px;
}

#spylist li img {
float:left;
margin-right:5px;
background:#EFEFEF;
border:0;
}
.spydate{
overflow:hidden;
font-size:10px;
color:#0284C2;
padding:2px 0px;
margin:1px 0px 0px 0px;
height:15px;
font-family:Tahoma,Arial,verdana, sans-serif;
}

.spycomment{
overflow:hidden;
font-family:Tahoma,Arial,verdana, sans-serif;
font-size:10px;
color:#262B2F;
padding:0px 0px;
margin:0px 0px;
}
-->
</style>
<script language='JavaScript'>


imgr = new Array();

imgr[0] = "http://i43.tinypic.com/orpg0m.jpg";

imgr[1] = "http://i43.tinypic.com/orpg0m.jpg";

imgr[2] = "http://i43.tinypic.com/orpg0m.jpg";

imgr[3] = "http://i43.tinypic.com/orpg0m.jpg";

imgr[4] = "http://i43.tinypic.com/orpg0m.jpg";
showRandomImg = true;

boxwidth = 255;

cellspacing = 6;

borderColor = "#232c35";

bgTD = "#000000";

thumbwidth = 70;

thumbheight = 70;

fntsize = 12;

acolor = "#666";

aBold = true;

icon = " ";

text = "comments";

showPostDate = true;

summaryPost = 40;

summaryFontsize = 10;

summaryColor = "#666";

icon2 = " ";

numposts = 10;

home_page = "http://www.bloggerehow.blogspot.com/";

limitspy=4
intervalspy=4000

</script>

<div id="spylist">
<script src='http://dl.getdropbox.com/u/708209/scriptabufarhan/recentspy/recentpostthumbspy-min.js' type='text/javascript'></script>
</div> <a href="http://www.bloggerehow.blogspot.com/"><font size="1px">Widget by Blogger eHow</font></a>


6. Now, just save the widget and check your blog for a new Recent Post Widget With Thumbnails

Enjoy!


How to add random post widget with thumbnails

Earlier I posted the HOW TO : Add Random Post Widget for Blogger/Blogspot and if you want a gadget which shows thumbnails, as showing in the image given below, from your blog then here is the solution for you.
Click on the button given below. If you are not logged in already to your Blogger account then it will ask you to login first after clicking on the Add To Blogger button below.
1. Now, select on which of your blog you want to add the Random Post widget.

2. Select the preferences which you want for your Random Post widget

3. Save the gadget and move it to where you want it to be appear on your blog.

4. All done. Now check your blog for the Random Post widget :)

Enjoy!


How to add signature to every post

In this blog post I’m going to write a quick guide on how to add your signature to every blog post in Blogger. To do that you just need to add a piece of code in your Blogger template in order to make the signature appear in the footer of your blog posts. So first you need to have an image of your signature. If you don’t have it then you can write it in a piece of paper and scan it or you can design it with Photoshop or other photo editing software.

To make your signature appear in your blog post in Blogger follow these steps:

1. Login to your Blogger account and go to Design.
2. Click at the Edit HTML tab which will lead you to the Edit Template page.
3. At the Edit Template page check the Expand Widget Templates option. Now you have to be careful here. First find <data:post.body/> and right after it paste the following code:

<img src=’URL OF YOUR SIGNATURE IMAGE‘ style=’border:0px; background: transparent;’/>
Upload your signature image, copy the url and paste it instead of URL OF YOUR SIGNATURE IMAGE and click SAVE TEMPLATE.
Now go back to your blog and see the changes. Happy blogging!


How to comment on blogs - introduction

One of the primary sources of getting back links to your blog is commenting on other blogs. There is a big difference between a back link and a quality back link. New bloggers often restrain themselves from commenting on popular blogs. A large number of bloggers do not know the correct way of commenting on other blogs. What is the purpose behind commenting? Is it just to acquire a back link or much more then that? Let's try to understand and find out the correct way of commenting, that not only give us quality back link but also helps in building our e-brand.

We will start by a sample comment.
Mr. XYZ 
Nice post, I like it!
Visit: http://xyz.com
What will you call this commentator? I am sure most of my fellow bloggers will identify this as spam. The main motive to leave such type of comment is to get a back link. Today search engines are smart enough to detect these spam comments, and their weightage is not counted when calculating the PR of any page.

Purpose of commenting?
  • Building your brand
  • Networking
  • Giving your views on a topic
  • Getting a back link

As you can see, getting a back link is way down in the list. With powerful commenting you can make your online presence felt among bloggers and can build your reputation.

Building your brand

To make your e-brand, you have to influence your readers by showing them your authority on a particular niche. Commenting is a powerful medium to show that. Top bloggers use this technique by getting involved in constructive and informative commenting. Glen Allsopp has discussed about building an e-brand, and he has included commenting as one of the ways to do it.

Networking

Commenting can earn you good friends and can help you build strong network of fellow bloggers. It helps in spreading your word and getting valuable resources and advice from these friends, which helps you in becoming a better blogger.

Giving your views on a topic

One of the obvious reasons to comment on other blogs is to say your word on the post topic. Your views can be a critical acclamation or a gesture of agreement. Speaking with open mind while commenting attracts reader's attention and they want to know more about you.

Getting a back link

Comments helps you gather back links for your blog. The SEO aspect of commenting cannot be ignored, as it is one of easiest way to get links. Do not pile up your comments on few chosen blogs. Try to comment on new fresh blogs and spread your links across the web.

How to comment?

  • Choose relevant content
  • Give meaningful comment
  • Follow up and engage in discussion
  • Don't be rude

Choose relevant content

Commenting on blogs not related to your niche is not a wise decision. A link back from relevant content has more value, than a comment on irrelevant content that is not associated to the content to which you are linking back. Sometimes, novice bloggers do not keep this in mind and comment on blogs that do not match the content, to which they are linking back.

Give meaningful comment

It is the most important thing to keep in mind while commenting. Just a "Hello" and intro about you is not the good way of leaving comment. Read the post thoroughly and give your views about the topic of the post. At times, there can be agreement or dis-agreement on the issue, but speaking your mind while commenting attracts the attention of author as well as of the readers.

Follow up and engage in discussion

Whenever you comment on some popular blog, make sure you follow up the comments and engage yourself in the comment trail, by actively participating in the discussion. This helps in authority building as it shows your views and knowledge about a niche.

Don't be rude

Never use any word that may queue up your comment for review or end up in trash bin. Maintain a tone of decency even if you do not agree with the author. Sometimes people use obscene language to draw attention of people. You may get banned from commenting on popular blogs if you use rude language, and it is a big loss.

Conclusion

Commenting is an essential part of blogging. It not only helps in off-page SEO, but also helps in building relationships with fellow bloggers. A good commentator can build strong network of friends, which proves to be very fruitful in the long run.

Happy blogging...


How to get instant traffic for your blog

Getting instant traffic for blog is not as hard as some people may think. By applying some clever techniques we can gain some good traffic for our blogs in no time. Some of these techniques are very easy to implement, while others requires some preparation before applying them effectively, Let us see how to take our share of pie from the traffic explosion on Internet.


Comment On Popular Blogs of Similar Niche

This is the most effective way to get instant traffic for your blog. Suppose you own a tech blog, and you are among the top 5 commentators on well known blogs in your niche, rest assured that you will get good traffic from there. Readers have the tendency to click on commentator's hotlink to know more about them. But having said that, one must keep in mind the correct way of implementing this method. Following things must be followed while commenting on high traffic popular blogs.

1. The blog should be of similar niche.
2. Give a useful and constructive comment.
3. Subscribe to 'Follow-up comments' and actively take it further.
4. Keep unique identity and use your Gravatar profile wherever possible.
5. Learn the art of taking criticism in positive way.

Engage in Discussion with Big Guns On Social Media Sites

Create and build up decent profiles on social media sites like Facebook and Twitter. Initiate a discussion with a popular blogger in similar niche. You can start by replying his public comment or tweet. Or can straight away ask some question. As soon as you get the response, try to build up the flow and exchange messages as long as you can. Your friends, communities and networks on social media site will notice this discussion, as large number of people will be following the big gun. The effect of this discussion will be that people will notice you exchanging views with the popular blogger, and they will try to know more about you, giving you the required traffic along with a little recognition.

Initiate Constructive Thread on High Traffic Forum

This is yet another excellent technique to get instant traffic for your blog. Sign up on various high traffic forums of similar niche. If you are a new forum user, it will take some time to get accustomed with forum etiquette, else you can start straightaway. Identify popular threads and jump into the bandwagon. You can also initiate your own thread with some hot topic. Remember, if you managed to create a popular thread on high traffic forums like Digital Point Forum, you will get tons of traffic for long time to come.

Use Social Bookmarking Tools

Build a network on Digg, StumbleUpon and similar sites, and use your network to bookmark and promote your blog posts. Digg and StumbleUpon are known to send huge traffic, once the post gets enough votes from the community. Make sure you do not misuse it and take care of usage guidelines; otherwise your blog may be banned on these sites.

Advertise

And last but not the least is an advertising option. If you have the required budget and if you are desperate for instant traffic, you can sign up for some good CPC campaigns on poplar advertising networks like Google Adwords.

Over To You

We can clearly see, that the first three methods require patience and time. I have often noticed that some of my fellow bloggers are not ready to invest time in these 3 methods, and still want traffic and popularity. Do you use these methods in diverting traffic flow to your blog? What other techniques you often use to achieve the same?


How to add Recent Comments - Wordpress Style

Blogger does not have an inbuilt recent comments feature. So you had to revert to Google to search for the best option to display recent comments, but none of them developed it as effectively as done in wordpress. So I made this very simple widget to display recent comments in Blogger - the Wordpress Style.

So by Wordpress Style I mean that it can display up to 4 different things. They are the Comment Date, Comment Author, Post Page where Comment was done, and lastly the Comment itself. The Comment URL in the recent comments feed have some weird links like "showComment=1213409400000#comment-c6962815339210283551" which actually do not direct to the actual comment but just the Comment's post page. So the Wordpress Styled Widget does the following tasks.
The Widget makes use of the fact that in Blogger blogs any 'posturl#comments' will take you to the position on page from where the Comments start just after the Post area. So when you click on the Post Page Link in the Recent Comments you will be directed to the comments on that page and not at the start of the page. Also the Commenter's name would link to the URL provided by the commenter while commenting.

Get Your Own Recent Comment Widget - WordPress Styled


Now Log into your Blogger account and go to Layout > Page Elements
Then Click on Add a Gadget
Then Choose HTML/JavaScript
Now Copy and paste the code below into HTML/JavaScript widget.

<script style='text/javascript' src='http://corpseofattic.com/scripts/recentcomments.js'></script><script style='text/javascript'>var numposts = 5;var showcommentdate = true;var showposttitle = true;var numchars = 100;</script><script src='http://www.bloggerehow.blogspot.com/feeds/comments/default?alt=json-in-script&callback=showrecentcomments'></script><div align='center'></div>

Note:
Change the number of posts var numposts = 5
Change to your blog URL www.bloggerehow.blogspot.com

Once you have adjusted the code according to your preferences, simply click the Save button in the HTML/JavaScript Widget.

Enjoy!


How to Add Random Post widget

Most of the bloggers add more sidebar widgets to increase pageviews. You can find Recent Post, Popular Post and Related Post widgets in almost all blogs. Now lets see displaying Random Post widget in blogger sidebar. Its a very useful widget because it lets you to show all older posts randomly fashion.  

Abdul-Hakeem.com is powered by Blogger. I use many widgets to improve page impression. The number of posts links in Random post widget to be displayed can be controlled by the webmaster. Now getting back to our topic,

Steps to Show Random Posts in Blogger:

1. Login to Blogger Account.
2. Go to Design –>Add a Gadget, and select it as “HTML/JavaScript” widget.
3. Now Copy and Paste this code in to it:


<script type='text/javascript'>
var randarray = new Array();var l=0;var flag;
var numofpost=5;function randomposts(json){
var total = parseInt(json.feed.openSearch$totalResults.$t,10);
for(i=0;i < numofpost;){flag=0;randarray.length=numofpost;l=Math.floor(Math.random()*total);for(j in randarray){if(l==randarray[j]){ flag=1;}}
if(flag==0&&l!=0){randarray[i++]=l;}}document.write('<ul>');
for(n in randarray){ var p=randarray[n];var entry=json.feed.entry[p-1];
for(k=0; k < entry.link.length; k++){if(entry.link[k].rel=='alternate'){var item = "<li>" + "<a href=" + entry.link[k].href + ">" + entry.title.$t + "</a> </li>";
document.write(item);}}
 }document.write('</ul>');}
</script>
<script type='text/javascript' src='/feeds/posts/default?alt=json-in-script&start-index=1&max-results=1000&callback=randomposts'></script>
<span style='font-size: 80%'>Widget by <a href='http://www.bloggerehow.blogspot.com'>Blogger eHow </a></span>


Note:
If you which to change number of post displayed.Change the no 5 marked as red in this code numofpost=5

Credits:
This widget script was developed by Field of Dreams

Enjoy!


How To Add Flash Animated Label Tags Cloud Widget

If it is said that “Pictures speak a thousand words“, then it would not be wrong to say that “Flash speak a million words“.

And because we all want our blogs look great for our visitors, we need to give our labels widget good style.

And here we are:
  • Go to Layout -> Edit HTML
  • Click on Expand Widget Templates
  • Find the next code (use Ctrl+f)
<b:section class=’sidebar’ id=’sidebar’ preferred=’yes’>
  • Past the next code just after the above one
<b:widget id='Label99' locked='false' title='Labels' type='Label'>
<b:includable id='main'>
<b:if cond='data:title'>
<h2><data:title/></h2>
</b:if>
<div class='widget-content'>
<script src='http://sites.google.com/site/bloggerustemplatus/code/swfobject.js' type='text/javascript'/>
<div id='flashcontent'>Blogger eHow by <a href='http://www.bloggerehow.blogspot.com/'>Roy Paran</a> and <a href='http://www.abdul-hakeem.com'>Field of Dreams</a></div>
<script type='text/javascript'>
var so = new SWFObject(&quot;http://sites.google.com/site/bloggerustemplatus/code/tagcloud.swf&quot;, &quot;tagcloud&quot;, &quot;240&quot;, &quot;300&quot;, &quot;7&quot;, &quot;#ffffff&quot;);
// uncomment next line to enable transparency
//so.addParam(&quot;wmode&quot;, &quot;transparent&quot;);
so.addVariable(&quot;tcolor&quot;, &quot;0x333333&quot;);
so.addVariable(&quot;mode&quot;, &quot;tags&quot;);
so.addVariable(&quot;distr&quot;, &quot;true&quot;);
so.addVariable(&quot;tspeed&quot;, &quot;100&quot;);
so.addVariable(&quot;tagcloud&quot;, &quot;<tags><b:loop values='data:labels' var='label'><a expr:href='data:label.url' style='12'><data:label.name/></a></b:loop></tags>&quot;);
so.addParam(&quot;allowScriptAccess&quot;, &quot;always&quot;);
so.write(&quot;flashcontent&quot;);
</script>
<b:include name='quickedit'/>
</div>
</b:includable>
</b:widget>
  • Customize you widget by changing the red words as: (Labels):title (250):width, (200):height, (#ffffff):background color and (000000):links color.
  • Click Save Template
  • Go to Layout and change its location as you like
Enjoy!


How to add subscription email form

A Subscription Email form is more important than a RSS feed Icon itself. People often love to receive your post Updates in their email inbox rather than in a reader. So make sure you make your Email From as eye appealing and eye catching as possible. So today we will again learn how to add an Email form, so lets get to work!

Follow these steps,
  • Log into your feedburner account
  • Click on the Publicize button and then click on Email Subscriptions link as shown below,
  • Then drag down the page until you see a HTML code, as shown below

Copy the HTML code for the email form and paste it in a WordPad or Notepad. The code may look like the one below,

<form style="border:1px solid #ccc;padding:3px;text-align:center;" action="http://feedburner.google.com/fb/a/mailverify" method="post" target="popupwindow" onsubmit="window.open('http://feedburner.google.com/fb/a/mailverify?uri=TntByStc', 'popupwindow', 'scrollbars=yes,width=550,height=520');return true"><p>Enter your email address:</p><p><input type="text" style="width:140px" name="email"/></p><input type="hidden" value="TntByStc" name="uri"/><input type="hidden" name="loc" value="en_US"/><input type="submit" value="Subscribe" /><p>Delivered by <a href="http://feedburner.google.com" target="_blank">FeedBurner</a></p></form>


Please search for the Green and Red texts as shown above in the HTML code that you just pasted in a notepad or WordPad.

Note that the red text in your code will be something like this,

http://feedburner.google.com/fb/a/mailverify?uri=Your-FeeD-Title

The end part of the URL above will contain your feed title, so look carefully for this URL in the code that you pasted in notePad

Now Log into your Blogger account and go to Layout > Page Elements

Then Click on Add a Gadget

Then Choose HTML/JavaScript

Now Copy and paste the code below into HTML/JavaScript widget.

<div style="border: 1px solid DodgerBlue; padding: 5mm;">
<center><img src="URL of Email Icon"/></center>
<span style="font-weight: bold;font-size:small;">Subscribe by E-mail & receive free updates of these cool Blogger eHow straight to your inbox!</span>
<form action="http://feedburner.google.com/fb/a/mailverify" style="padding: 3px; text-align: center;" target="popupwindow" method="post" onsubmit="window.open('http://feedburner.google.com/fb/a/mailverify?uri=TntByStc', 'popupwindow', 'scrollbars=yes,width=550,height=520');return true"><center style="font-weight: normal">Enter your email address:</center><p><center><input type="text" style="width:140px" name="email"/></p></center><center><input type="hidden" value="TntByStc" name="uri"/><input type="hidden" name="loc" value="en_US"/><input type="submit" value="Subscribe" /></form></center>
NT:- The Code in your notepad will be used only to get some info out of it. Our main code is the code above.

Please adjust the code according to your preferences in the following way,
  1. DodgerBlue : This refers to the colour of the frame/outline surrounding the Email form, You can change it to any colour. For example, White, Black, Red , Green etc.
  2. URL of Email Icon : This refers to the URL of your Email Icon. Please first choose a Email Icon of your choice by clicking here Once you have download your Email Icon, upload it to Photobucket and get the URL for it. Then simply replace the text URL of Email Icon with your Email Icon URL.
  3. http://feedburner.google.com/fb/a/mailverify : Replace this text with a similar URL in your code that you had copied in a notepad.
  4. http://feedburner.google.com/fb/a/mailverify?uri=TntByStc : Replace this URL with the URL in the notepad code.
  5. The bolded Black Text refers to the text that appears below your Email Icon and above Email form. You can change it to anything that suits your blog topic.
  6. TntByStc: Replace this text with your Feed Title. 
  7. Subscribe : This is the text that appears on the Email button. You can change it to anything you like. For Instance: Submit, Hit Me!, Join Me! etc.
Once you have adjusted the code according to your preferences, simply click the Save button in the HTML/JavaScript Widget.

Now visit your blog to see a pro looking Subscription Email Form hanging on your sidebar :)

Just like the one below,

I hope it works for you. Enjoy!


Related Posts Plugin for WordPress, Blogger...

Comments

Twitter Delicious Facebook Digg Favorites More